Lyndar the Merciless

a personal beauty + lifestyle blog

. .

Wedding Wednesday: Something blue, mostly

Wednesday, September 26, 2012   |   3 comments


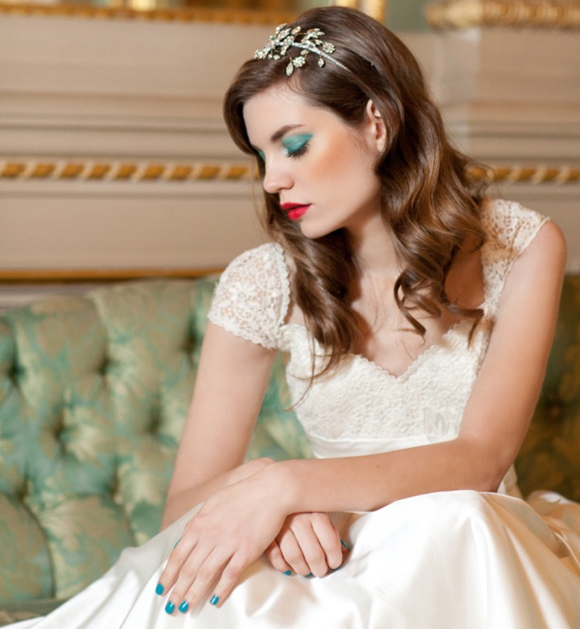
Another Wednesday, another little lot of non-French manicured, non-natural bridal manicures - and indeed pedicures - to show you! Today's are a bit more out there than the reds, pinks, and corals of the last few weeks, but don't let that put you off: you might never in a million years want to wear blue polish on your fingernails for your wedding day, but it makes a gorgeous choice for toes as your "something blue".

Let me know if any of these take your fancy...


{images via: 1 & 2. Rock 'n' Roll Bride; 3. Inspired By This; 4. Love My Dress; 5. Rock 'n' Roll Bride; 6. photography by Stephen Brace; 7. Inspired By This; 8. Project Duo; 9. Love My Dress; 10. Inspired By This}

Labels: , ,

My new favourite nail thing.

Tuesday, September 25, 2012   |   3 comments


I'd been hunting for it for ages, but it wasn't until right before I headed off on holliers that I finally managed to get my paws on the much-hyped Magic Nail Polish Remover from Bourjois (£4.99/€6.) It's an '80s-stylee dip 'n' twist off nail polish remover (for anyone who doesn't remember them from the first time around, that means the pot contains a remover-soaked sponge with a hole for dipping each painted fingernail into) and since I haven't had much luck with Bourjois products in the past, to be totally honest I was a weeny bit sceptical about the rave pre-launch reviews.

That's why I also picked up a random cheapo version from Pretty Quik (£2.50) for a spot of comparison testing.


The pink Bourjois pot definitely has the edge where Barbie-pleasing prettiness is concerned, and what initially feels like a steep price point begins to look decidedly more reasonable when you take into account the fact that it's a little over twice the size of the Pretty Quik offering (75ml of remover vs. 30ml.)

When the lids come off, the product differences become more apparent.


Obviously the type of sponge used in these dip 'n' twist off removers is really important: it needs to be sufficiently rigid and tightly compacted to offer decent resistance when a nail is rubbed against it for efficient polish removal. 

In fairness, while the Pretty Quik sponge is much softer, has more give, and has a much bigger finger hole (oo-er) than the sturdier Bourjois sponge, it does get the job done without too much more swishing the nail around.

{a very rare glimpse of my nails in the nude}

Where the Bourjois remover comes into its own for me is taking off tricky to remove and seriously pigmented polishes. It made easy work of shifting all traces of the gorgeous Essie Aruba Blue, while the Pretty Quik product left traces of post-polish staining on my nails. I've tentatively used it with a few glitters, too, and had impressive results.

I'd take issue with the "1 second per nail!" claim (and the "Magic" portion of the name, if I was feeling especially pedantic) but in all other respects I'm a convert to Bourjois Magic Nail Polish Remover. It performs at least as well as some professional grade products I use without stripping nails (it contains nourishing sweet almond oil and is acetone free), smells fruity rather than stinking of polish remover (much to the relief of Himself and the dog), and eliminates the need for cotton wool, pads, or squares, which means no more pesky flyaway strands ending up in your fresh polish.

I'll probably continue to use Pretty Quik for travel because of its smaller size, but otherwise Bourjois will be my go-to for the foreseeable future.

The professional products have been retired. I'm that impressed with it.


Labels: ,

NOTD: Black and yellow mix

Friday, September 21, 2012   |   9 comments


I dragged some young wan who never bothers to moisturise her hands or wear gloves in out of the cold, painted her nails with one coat of Sally Hansen White On and three (!) of Chanel Mimosa, and then got busy with a black nail art pen for the mix and match detailing.

This paint job's actually been in place since last Sunday which is why it's looking a bit rough around the edges, but apart from that it's held up pretty well.

I wish I could have taken nicer photos, especially of the nail with the bee, but no matter how much white balancing or correcting I did my fingers maintained a weird white-red cast. That's what I get for trying to be all fancy with my black backdrop, I guess.

Edit: I switched out the weird finger photos that I originally posted for these arty colour splash versions. Much better! 


Products used:
CND Stickey base coat
Sally Hansen Xtreme Wear in White On
Chanel Le Vernis in Mimosa
Topshop Crystal Clouds
Black nail art pen (brand unknown)
Seche Vite top coat

Labels: ,

Wedding Wednesday: Pretty in pink and peach and coral

Wednesday, September 19, 2012   |   2 comments


Who's ready for some more lovely inspirational images of colourful wedding nails? I know I am, so we'll dive right in to this week's instalment of pink, peach, and even coral bridal fingertips.


Mmm. Gawjus!

{image credits 1. user KatNYC2011 on Weddingbee; 2 & 3. Love My Dress; 4. Gladys Jem; 5 & 6. Inspired By This; 7. Love My Dress}

Labels: , ,

Liar liar shoes on fire.

Friday, September 14, 2012   |   3 comments

Remember how I said last week that I'd no black flats?

Literally the next day a shoebox at the back of the wardrobe made a liar out of me.

I was having a big clear out of stuff to donate when I came across these perfect-for-AW12 beauties:


So apologies for my inadvertent fib, but yay for a pretty great accidental find! And for anyone who doesn't speak shoe, well, it was like discovering a forgotten fifty quid note in the back pocket of an old pair of jeans :)

Labels: ,

Talontastic Thursday: The Marian Mani

Thursday, September 13, 2012   |   2 comments


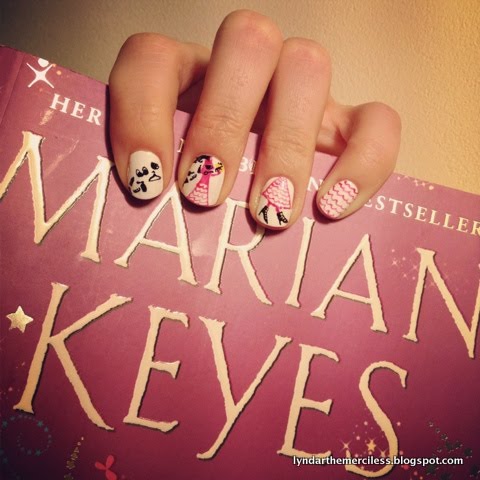
Since I'm a bit of a Marian Keyes fangirl I couldn't really let the day pass without doodling some nail art inspired by the cover of her latest novel.

a be-Marianed paw

that skirt screamed "putmeonyourNAILZ!" as soon as I saw it

The scallop detail would look fab as a nail design in its own right, as you can see from my little finger. To DIY:

1. Apply base coat (I like CND Stickey.)
2. Apply two coats of white nail polish (I used Sally Hansen Xtreme wear in White Out.)
3. When dry, use a small detailing brush or nail art pen to add horizontal rows of hot pink scalloping.
4. For an easy accent nail, you could simply reverse the colours on your ring finger or thumb - so a hot pink base with white scallops - or alternatively you could pull in some of the black or yellow from the cover to the design. White detail on a black nail is always a winner, and I don't see scalloping being any exception.
5. Finish with top coat (my favourite is fast-drying Seche Vite, which minimises drag on nail art.)

The Mystery Of Mercy Close was released today in both e-book and real book formats. I'm a bit torn between the two - should I opt for the convenience of the Kindle version or stick with tradition and add to my collection of Marian hard copies? - but whichever way I jump, I'm looking forward to having a read of it.


Labels: ,

Wedding Wednesday: In the red

Wednesday, September 12, 2012   |   2 comments


Wearing colour on your fingertips on the big day isn't for everyone, but I love colourful bridal nails. They really pop against the dress and, of course, help pull focus to that all-important ring finger. Over the next couple of Wednesdays I'm going to show you just how gorgeous coloured polishes can be on brides and hopefully prove that a lick of polish can work with any style of wedding. If you're undecided whether to wear colour or not on your wedding day, well, I can pretty much guarantee that this little series will put you firmly in the pro-colour camp.

Let's kick things off with a selection of reds. From apple to coral to vampy, red is far and away the most popular choice for anyone looking for an alternative to French or nude wedding nails - and with good reason. Red polish is an out-and-out classic, well within most people's comfort zone, and is very versatile, as showcased by these glamorous, retro, rustic, chic, informal, and traditional brides.

Oh, and it looks amazing in photos.


Any takers?

{image credits 1. Kate Benson Photography via Salt Lake Bride & Groom; 2. Eliza Claire via Love My Dress; 3. Lizelle Lotter via Love & Lavender; 4. Annamarie Stepney via Love My Dress; 5. Emma Holder; 6. Aaron Snow via Inspired By This; 7 & 8. Brooke Courtney via Inspired By This; 9. user Ladytron on Weddingbee; 10. via A Perfect Celebration} 

Labels: , ,

MonDIY: Kate Spade-alike dot jewellery dish

Monday, September 10, 2012   |   2 comments


A lot of the American lifestyle bloggers I follow enthuse about pretty little dishes and trays like they're the Second Coming of Christ. Apparently they're only wonderful for corralling your home office supplies/perfumes/jewellery/hair ties/bobby pins, and while the overuse of "corral" in these situations makes me want to punch someone I have to admit that these dish and tray evangelists might be on to something.

There's no doubt that piling your crap into neat bundles does instantly make a place look tidier. And it's quicker than actually putting the stuff away, and it makes things easier to find the next time you need them if you're like me and would forget where you left your elbow if it wasn't attached.

Win win win!

I thought I'd try my hand at DIYing a dish for hairclips and the like, inspired by this gold confetti dot sprinkled Kate Spade Ticker Tape plate.


It turned out so well that I decided to share the process in case anyone else has ephemera that's in dire need of corralling.

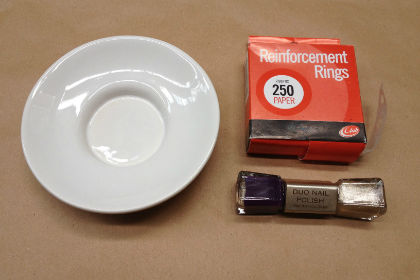
You will need:
- small white dish (I upcycled a soap dish the last tenant left behind)
- hole reinforcement stickers (these were surplus from a previous nail project)
- metallic gold nail polish (this is an old H
&M duo) 

(Please note that the end result will not be food safe.)


Stick the hole reinforcers onto the dish in your desired pattern. I followed the distribution of the gold Kate Spade dots as closely as I could.


Apply two thin coats of nail polish to the inner circles of the hole reinforcers, leaving 15 minutes between coats. (I'd recommend brushing one coat on in horizontal strokes and one in vertical strokes to help disguise brush strokes.) To minimise pooling and help ensure a crisp, flat outline, begin and end each brush stroke on the sticker rather than the dish.


Let the final coat of polish dry for 15 minutes.


Begin to get excited that your new dish is going to look all kinds of awesome.


Carefully remove the hole reinforcement stickers with tweezers. (This is a classic case of do as I say, not as I do, because I couldn't find my old tweezers and used my nails like a twit.)

Add a gold rim freehand to the edge of the dish if desired - any wonky bits can easily be corrected with a bit of nail polish remover and a cotton ear bud.

If you want to create overlapping dots, repeat with a second round of stickers but remember to lessen their tackiness first by pressing them to your fingertip a few times. You don't want them lifting that first layer of gold paint when you take them off.

The end result:


Nice, right?

Dress up your zero quid new dish with some jewellery or whatnot (because it's clearly too lovely to use for boring old brown hairclips) and enjoy!


{top image via Sears, all others by me}

Labels: , , ,

Something for the weekend: Fantasy new season threads

Friday, September 07, 2012   |   2 comments


When the spending ban lifts and my credit card balance levels out, I'm planning to be very sensible indeed with this year's winter purchases. I'm really feeling the Girl With The Dragon Tattoo-inspired dark/gothic/leather-or-lace trend, and there are lots of key pieces around that nail the look but could still be worn for many winters to come.

Here's a taste of what's caught my eye in the first of the new season high-street drops:


How's about that for instant AW12 chic? This is pretty much my perfect autumnal look, I think: loving the cape (£tba), faux leather trousers (£40), and front of those black ankle boots (£70, they're a bit gick from the back) all from Oasis.


See, if I worked somewhere that necessitated the wearing of LBNs (little black numbers) I'd be all over this River Island sequinned mesh top (£45) like a sparkly rash. Or, er, maybe it'd be all over me like a sparkly rash. Either way, there's no such thing as too much bling in my book, and I'm an absolute sucker for shoulder detailing.


If that's too much black 'n' bling for your palette, what about this navy Oasis blouse (£48) with lace detailing? It's sweet without being overly saccharine, and navy tends to be more flattering on paler skintones than black (cue my mother's voice in my head telling me that black makes me "look very washed out" every time I wear it next to my face.) 


This is so impractical - I can't do sleeveless for day after about mid-September - and of course it fails the Mam test but there's something about this faux leather peplum top from Oasis that really appeals to me. It's a bit tough, a bit girly, and I can see it going with tons of stuff that I already own.


Would you believe I don't possess a single pair of black flats? True story. These studded Kurt Geiger flats are amaze-o but at £95 they're also really bloody expensive, so they're unlikely to be making it into my collection anytime soon. (I'm still totally going to visit them and pet them every time I pass a KG stockist so they don't start to fret that I've forgotten about them. Poor ickle shoesies.)

Have you seen any AW12 lust-haves yet? Leave me a link to them in the comments and we can go virtual shopping together!

Labels:

. . . . « Older Posts . . . . . . . . . . ..Home. . . . . . . . . ... Newer Posts » .

 
Related Posts with Thumbnails