MonDIY: Kate Spade-alike dot jewellery dish
Monday, September 10, 2012
|
2 comments
A lot of the American lifestyle bloggers I follow enthuse about pretty little dishes and trays like they're the Second Coming of Christ. Apparently they're only wonderful for corralling your home office supplies/perfumes/jewellery/hair ties/bobby pins, and while the overuse of "corral" in these situations makes me want to punch someone I have to admit that these dish and tray evangelists might be on to something.
There's no doubt that piling your crap into neat bundles does instantly make a place look tidier. And it's quicker than actually putting the stuff away, and it makes things easier to find the next time you need them if you're like me and would forget where you left your elbow if it wasn't attached.
Win win win!
I thought I'd try my hand at DIYing a dish for hairclips and the like, inspired by this gold confetti dot sprinkled Kate Spade Ticker Tape plate.

It turned out so well that I decided to share the process in case anyone else has ephemera that's in dire need of corralling.
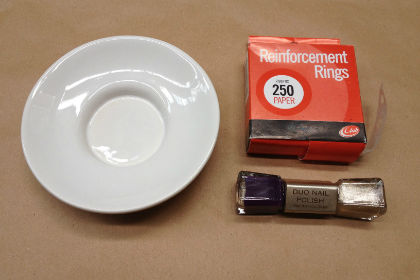
You will need:
- small white dish (I upcycled a soap dish the last tenant left behind)
- hole reinforcement stickers (these were surplus from a previous nail project)
- metallic gold nail polish (this is an old H&M duo)
(Please note that the end result will not be food safe.)
Stick the hole reinforcers onto the dish in your desired pattern. I followed the distribution of the gold Kate Spade dots as closely as I could.

Apply two thin coats of nail polish to the inner circles of the hole reinforcers, leaving 15 minutes between coats. (I'd recommend brushing one coat on in horizontal strokes and one in vertical strokes to help disguise brush strokes.) To minimise pooling and help ensure a crisp, flat outline, begin and end each brush stroke on the sticker rather than the dish.

Let the final coat of polish dry for 15 minutes.

Begin to get excited that your new dish is going to look all kinds of awesome.

Carefully remove the hole reinforcement stickers with tweezers. (This is a classic case of do as I say, not as I do, because I couldn't find my old tweezers and used my nails like a twit.)
Add a gold rim freehand to the edge of the dish if desired - any wonky bits can easily be corrected with a bit of nail polish remover and a cotton ear bud.
If you want to create overlapping dots, repeat with a second round of stickers but remember to lessen their tackiness first by pressing them to your fingertip a few times. You don't want them lifting that first layer of gold paint when you take them off.
The end result:

Nice, right?
Dress up your zero quid new dish with some jewellery or whatnot (because it's clearly too lovely to use for boring old brown hairclips) and enjoy!


{top image via Sears, all others by me}
Labels: Crafts, DIY, House + Home, Interior Inspiration


2 Comments:
At 12:51 pm, September 11, 2012, deni-o said…
I am loving those rings! And the plate looks pretty cool too!
At 11:02 am, September 12, 2012, Unknown said…
Ha ha thanks missus!
Post a Comment
<< Home